

- Monday, September 01, 2025
- 0 Comments

Oh là là! C'est presque septembre. But have no fear, Mme Reid is here with her inaugural Core French Connection Summit! From Thursday, August 21 to Friday, August 22, you can attend this virtual summit and watch nearly two dozen presentations for FREE. Also included is a keynote address by Denis Cousineau, an interactive bingo game and a chance to win prizes, such as a $250 gift card for Reitmans, a $175 gift card for StickerYou, and a copy of my French Digital Calendar for the 2025-2026 school year. Session topics range from how to run centres as well as structured literacy in the Core French classroom to healthy habits for busy educators and how to create interactive activities using Google Slides (presented by moi).
Don't have time during the two days of the virtual summit? An all-access pass is available for $70 which will give you a year to stream the sessions any time you like and it includes extra perks:

My session will be available on Thursday, August 21 so I hope to see you there. All attendees can also connect with one another, as well as the summit speakers and presenters, via a CoLab Education professional community created for this summit, so feel free to reach out to me if you have any questions or connect with me on my social channels, such as Instagram, Facebook or the app formerly known as Twitter.
Disclosure: This blog participates in affiliate marketing.
- Tuesday, August 19, 2025
- 0 Comments

Today I am sharing a quick little activity I threw together for my grade 2 students who are working on La poule Maboule. I drew the outline of the characters' heads so that students can illustrate their faces and provide a brief description by filling in the blanks and indicating comment ça va. The students really loved working on this activity and many teachers have been asking for a copy. So, here it is! Click on the thumbnails below to download your free copy.

- Monday, January 27, 2025
- 2 Comments

For Remembrance Day, I wanted to introduce my younger students to some thematic vocabulary and decided to put something togething using Book Creator. I love that you can easily create a book with beautiful images and customizable elements such as page borders and fonts, but you can also upload media such as audio files, as well as embed videos. Here is my book on "Le jour du Souvenir" that includes the Last Post (Dernier Appel) and a video reciting Au champ d'honneur that includes subtitles.
- Sunday, November 10, 2024
- 0 Comments

This year, our school had our own festivities in honour of the Carnaval de Québec, thanks to our student council volunteers and teacher leads. We had theme days, such as tuque day and red and white day, as well as school-wide bingo over the PA system. We also had a different staff member wear la ceinture fléchée on each of the five days and students had to write down their names on a ballot for a chance to win a prize. On the last day, we had a volunteer dress in a Bonhomme costume and take pictures in front of a Carnaval themed background I had designed.
In my grade 5 class, I showed them a YouTube video of les meilleurs moments du Carnaval 2022 and then we read a little paragraph about the Carnaval. I turned it into a texte qui disparaît activity, which I had first learned about from Richard Smith, a retired AIM French teacher. It's so much fun! The text is repeated on multiple slides but each slide has more and more words removed, with only the first letter remaining. The students really seem to enjoy the challenge of trying to recall the missing words. I then showed them the video of one of my favourite Carnaval songs - Salut, Bonhomme! Then I take out des cuillères and teach them a simple folkloric rhythm that they can use with their hands or to test out when I hand out my wooden spoons. TIP: I added both videos to the Google slidedeck to avoid any ads. Click here if you'd like a copy of the slidedeck above.

And if you own a Cricut machine, check out my Design Space page by clicking the image above. I have created three Carnaval themed projects using basic shapes and free images, which means you can make them without a subscription:
- Joyeux Carnaval 2024 Pennant Banner
- Palais de glace sign
- Palais de glace - Extra Large (This is a modular design that fits on letter-size cardstock.)
For those who do not have a Cricut machine, I have created a PDF of the Joyeux Carnaval banner, which can be printed directly on to cardstock or regular printer paper and cut out by hand.
Of course, you have to visit the official Carnaval de Québec website, which has links to their social channels for those who like to follow along from afar, including the carnavaldequebec YouTube channel where you will find a variety of video montages and highlights from over the years. The site also has a teacher's corner where you can download free levelled educational kits containing worksheets. In addition, you can order old effigies, which make great prizes.
As always, feel free to share ideas on how you celebrate at your school by leaving a comment below.
Joyeux Carnaval!
- Saturday, February 03, 2024
- 1 Comments

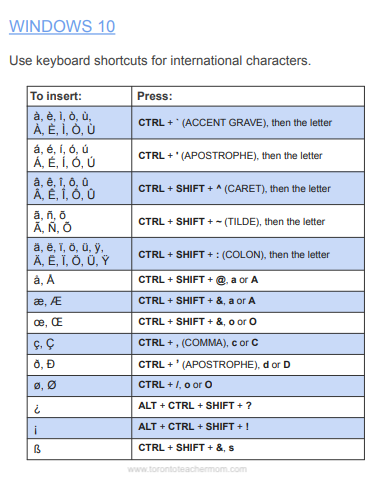
Remember when we first pivoted to online learning back in 2020? I know. I'd rather soon forget, too. If I look at the silver lining, I would say that people, both students and staff alike, are tech-savvier than ever. I remember one of the greatest challenges, though, was trying to help students figure out how to use their devices when some had Windows 10 laptops, Chromebooks, or iPads. Figuring out how to type in French using accents was particularly difficult, since I use my own MacBook and type instinctively using what are known as "dead keys". Chrome extensions were are a solution for some but now they appear to be blocked, nor would they be useful when typing within a Word document using the desktop application. So I started compiling the different shortcuts and requirements, such as adding an international keyboard, for Windows 10 computers, Chromebooks and Apple devices.
Keyboard Shortcuts for Adding Accents and Other International Characters
 |
 |
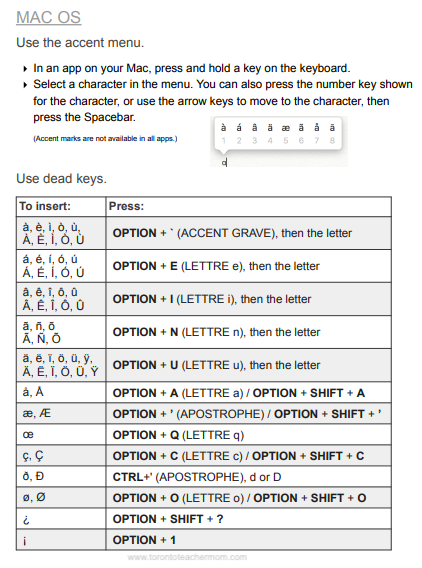 |
After trying out these shortcuts on the various devices that I have access to, I have compiled them all into one doc for ease of sharing. The heading on each page is also hyperlinked to the source I referenced. If you'd like to view the document, check out Keyboard Shortcuts for Adding Accents and Other International Characters. I hope that students and teachers find this to be a useful reference.
Don't forget to check out these popular blog posts:
 |
| Click on the image above to access additional resources, tips and tutorials. |
- Monday, February 14, 2022
- 0 Comments

After posting the read-along for Je vous salue, Marie, I have been meaning to create one for the new translation for Notre Père. And so, le voilà! Using Google Slides with animated text boxes that fade in on click, I also recorded myself reading it using the Screencastify Chrome extension and then uploaded a copy to my YouTube channel. The reason I prefer this over simply sharing the video file from my Google Drive is that there is a cap on daily views. This means that, once it exceeds daily views, students are unable to watch the video and then I get a tonne of requests to have access to the file. (This happens similarly with audio files housed in Google Drive, in particular with the audio files from my widely used listening activity on prepositions.) Fortunately, YouTube has no restriction on daily views and, because it is a Google for Education app, they can easily be embedded within Google Slides.
If you'd like a copy of the slide deck I created for Notre Père in order to change the last part from "Tous les saints, priez pour nous" to your school's saint, click here.
|
| Click on the image above to access additional resources, tips and tutorials. |
- Wednesday, April 21, 2021
- 0 Comments

During distance learning last spring, I explored a variety of ways to create interactive and engaging activities for my FSL students, and even designed a virtual French classroom in Google Slides. It was also the perfect opportunity to explore ways that I could leverage Flippity.net tools and so I created a fun Easter Egg Hunt. Then I tried out the Flippity Manipulatives template and I was hooked. It is a great tool for creating virtual "magnetic poetry" tiles of sorts so I created several versions of "Make your own silly sentences" and "Put the words in order" that coincided with activities and vocabulary for the AIM Language units we had been working on. Here is an example:
After you make a copy of the Flippity template, you can easily customize it. I love that you can add as many words as you like, although if you add more than 30 it gets too crowded, and that you can colour each tile, which is handy to identify parts of speech. If you don't specify a colour, it defaults to white.

Under the Backgrounds tab, you can add links to different background images such as the blackboard image I used. The manipulatives template on Flippity.net has a variety of backgrounds, such as columns, rows, grids and a venn diagram, which are great for sorting words, and other textures. If you want a specific background set as the default, you need to list it at the top on the spreadsheet. Students can also select whichever background they want by clicking on the settings gear icon at the bottom right.

Under the Options tab, you can have the word times appear randomly every time students access the link or appear in the order in which you listed it on the Terms tab. Then, after you publish the Google Sheet to the web, you would go to the "Get the link here" tab and copy the Flippity url generated for you to share with students directly, or you could embed it into your Google Site, like I did here:

And the bonus is, as long as you keep it published to the web, anytime you makes changes to the spreadsheet, they will automatically appear for students whenever they click on the link or refresh the webpage.
Since I changed the share settings to this particular spreadsheet to "Anyone with the link can view", you can easily make a copy by clicking on the Share link at the bottom and selecting the Google Sheets icon and then got to File - Make a copy.
To have students show their work, I have them take a screenshot to upload via Google Classroom and then I publish them on our class website. I also curated videos to demo how to take screenshots on a Chromebook, Macbook and a Windows computer. The manipulatives will work on mobile devices, too, but if using a smartphone, they should turn their phone to landscape in order to be able to see all the tiles.
|
| Click on the image above to access additional resources, tips and tutorials. |
- Saturday, September 05, 2020
- 3 Comments

Cowabunga, it's been a busy few weeks! I have been working away, trying to come up with innovative ideas for remote learning and boy, has there been a lot of trial and error. But when I challenge myself to find a solution, I don't rest until I do. And, while I'm still not 100% content with it, I have found a fun way to create a listening activity within Google Slides. For this example, I chose to focus on French prepositions using PNG images I found through Google image search and combined in Drawings. I had initially created them for the Quizlet study set below.
I love them so much, I decided to use them in an audio book I designed using Book Creator.
I wanted to create a listening test for my students using these same images in a Google Form, where the students had to listen to an audio clip and then click on the corresponding image in multiple choice questions. I embedded the form into my Google Site and tried embedding the audio clips next to the form but the audio player wouldn't play the files consistently; sometimes they would work and other times, not at all. So I resorted to creating a manipulative type of activity in Google Slides instead.

First, I added all of the images into a layout in the slide master. This can be accessed by navigating to Slide - Edit master. Then I added circles to each image, written instructions and shapes. On a new slide, I selected the layout I had created and began inserting my MP3 audio files.
How to Add Audio Files to a Slide
- Record your audio. You could use an online tool, such as Online Voice Recorder, or you can use a recording app on your device. I use the Voice Memo app on my iPhone but it requires the extra step of converting it from an MP4 to an MP3 through iTunes.
- Create a dedicated audio folder in your Google Drive and change the share settings to "Anyone with the link can view". That way, whenever you drop an audio file into that folder, the same share settings will apply. This is important because if you don't change the share settings on your audio files, no one will be able to play them.
- Change the audio icon to another image, whether it be a number or a letter, for example. To do this, click on the audio icon to access the option to replace image, which will appear in the menu bar above the slide. You could upload images, use images in your drive or select from a Google image search. For the prepositions activity, I created my own PNG number graphics in Drawings using word art and for each audio file, I replaced the audio icon with the corresponding number. This will make it easier for me to mark.

While I was hoping to avoid having to manually correct this listening activity given that I have over 160 students, I still like how it turned and I think my younger students will enjoy this type of activity.
If you like, you can make a copy of Les prépositions - activité d'écoute to use with your own students.
NOTE: Because this file has been copied so many times but each copy still links back to my original audio files, I strongly recommend recording your own audio files and inserting them into the file using the three steps above. I have been receiving hundreds of share requests from students from across the province who are unable to listen to the files. This is because Google maxes out at 500 daily "views".
|
| Click on the image above to access additional resources, tips and tutorials. |
- Wednesday, May 27, 2020
- 8 Comments

Ever since I first started teaching core French 16 years ago, I've always wanted my own classroom. I kept thinking how nice it would be to have my own space where I could set up learning centres, or a French library, or a coding corner, or a word wall, or a... er, I'm getting a little carried away, aren't I? The point I'm trying to get at is that I've always wanted a classroom to call my own, one that I could customize the way I feel would best facilitate French language acquisition amongst my students. In short, I've longed to fully immerse my students in the target language to maximize learning in the few 30 minutes that I have with them each day. Well, thanks to some incredibly inspiring teachers who have embraced the latest trend in distance learning, I have jumped on board the virtual bandwagon and now have my very own virtual French classroom. Squee!
I really wish I knew who started this trend so I could thank that person profusely since this is one of the most brilliant ideas I have come across in a very long time. There are so many tutorials out there but many of the posts I've been seeing on Twitter have been sharing this handy video tutorial by Thomas Blackmore:
For my virtual classroom, I've decided to only activate a few items this week and have created an audio message, similar to my interactive French activities, to challenge my students to find three hidden activities. (Can you find them all?) I've also added audio messages to the cat and to my Bitmoji as clues. Two of the activities lead to activities that I've embedded into my Google Site and one leads them to a virtual tour. Next week, I plan to add more active links and perhaps a couple of additional objects to my classroom as an ongoing "Where's Waldo?" type of activity. I also plan on making a slight change each day, such as the placement of the cat, and challenging students to identify what has changed from the previous day. For example, "Aujourd'hui le chat est sur le tapis." (Talk about the authentic use of the target language!) I have so many ideas on what else I'd like to try within my room, my head might explode! For now, I will share my top five tips for designing your own virtual classroom.
Top 5 Tips for Designing a Virtual Classroom
- When inserting images, add either "png" or "transparent" to your search query to find objects that have a transparent background.
- If you can't find an image in the colour you're looking for, insert an image and click on it. Then go to Format options that appears on the menu above (or right-click on the image) and select an option from the Re-colour menu that appears on the right panel. I did this for the easel, blackboard, window, shelf, rug and stool, using the grayscale option. It brings me great joy to have everything all "matchy matchy"!
- To add audio to an image of your choice, first add the audio file to your slide. Then click on the audio icon and click Replace image which will appear in the menu bar above. Then either search for the image in Google or upload an image. If the new image is not square, parts of it may be cut off but it is easily fixed by clicking on the "crop image" icon and adjusting the bold, black cropping handles as required.
- If you plan on using various Bitmoji stickers, I suggest creating a file folder and downloading your favourite ones. I chose to add them to a folder in Google Drive by using the Google Drive Desktop App. This has been a game changer for me since I can easily drag and drop my Bitmoji stickers directly from the Bitmoji extension into a dedicated folder on my Google Drive through the desktop client, and the stickers maintain their transparent background. This has a number of benefits such as eliminating the need to save to your computer and taking up precious space on your hard drive. You can also alternate changing your Bitmoji outfit using the Bitmoji app and then copying those stickers to your Google Drive folder so you can access different outfits later. It is also great if you plan on attaching audio files to your Bitmoji, since you need to replace the audio icon image with another. (You cannot copy and paste your sticker from the Bitmoji extension and then add audio to it, unfortunately.) This way, you could replace the image via your Drive. Here is a tutorial on how to use the Google Drive Desktop Client:
- For any objects that you wish to keep stationary such as the wall, flooring, or blackboard, I recommend that you add those to the slide master. It just clears up your canvas as it can get crowded with several images and it's not always easy to isolate a single image if you need to move it or make changes. To access the slide master, click on Slide - Edit master.
If you'd like to use the template I created, click here for a similar version in View only mode. Click on File - Make a copy so you can customize it.
|
| Click on the image above to access additional resources, tips and tutorials. |
- Tuesday, May 12, 2020
- 20 Comments

Using Google Slides with animated text boxes, I recorded a read-long of the Hail Mary prayer in French for my students for Catholic Education Week. I have also created one for the new version of Notre Père. The screencast was recorded using the Screencastify Chrome extension. It's pretty easy to use once you have added the extension (which only works on a computer and not mobile devices) and have enabled your video camera and audio input.
Useful Tips for Creating Video with Screencastify
- If you want to create a screencast of a Google Slides presentation in presentation mode, which is useful if you want to take advantage of animation or slide transitions, change the part of the URL that says "edit" to "present". It will open in presentation mode within your browser tab so that you can access the Screencastify extension and begin, pause or stop the recording.
- Use a headset or earphones with a built-in microphone. I use my old Beats Solo headphones (which I got for free one year during a back-to-school promotion when I purchased a new MacBook Air at my local Apple Store!). I find the sound quality is better than the built-in mic on my computer, especially because it doesn't pick up much background noise or the annoying clicking sound each time I press a key to advance through the slides.
- Wait a few seconds after the recording begins before talking so you can close the toolbar that pops up at the bottom left. Then you can you trim the video once it loads in a new Screencastify tab by adjusting the scissors. You can also crop the video, too, if you open the file in the Screencastify Editor.
If you'd like a copy of the slide deck I created for Je vous salue, Marie in order to change the last part from "Tous les saints, priez pour nous" to your school's saint, click here.
|
| Click on the image above to access additional resources, tips and tutorials. |
- Monday, May 11, 2020
- 4 Comments

Several weeks ago, I came across a template for a Weekly Planner for Online Lessons by SlidesMania that I loved so much, I decided to tweak the colour theme and I have been using it for interactive activities for my FSL students ever since. I share with them the link to the published version (which is found under File - Publish to the web) so that they can more easily navigate between slides, watch videos and click on the audio files.

The sample slide deck I am sharing below was designed for my grade 2 core French students. For that grade, the curriculum focusses on listening and speaking, which is not so easy to do during distance learning. So that's why I find the audio feature in Google Slides super handy. I use a lot of YouTube sing-alongs, too. I've also created a French Google Site where I can embed my slide deck at the top and my published Book Creator audio books, my customized Flippity activities and manipulatives, the use images in the slide deck to hyperlink directly to them.

And of course, I couldn't pass up the opportunity to add some Bitmoji stickers of yours truly. This is done by way of the Bitmoji Chrome extension. You're sure to find one for pretty much any occasion. You can also get stickers with French expressions by switching the language on your Chrome browser to French!

Tips for Adding a Certain Je ne sais quoi to Your Google Slides
- When searching for images, add "png" or "transparent" to the end of your search query to find images with transparent backgrounds. These are very handy when you are overlapping other objects on your slide.
- Add depth to images by selecting the image, then selecting Format options and enabling the drop shadow feature. I'm a little addicted to this one. F
- Can't find an image in the colour you want? Adjust the colour and brightness under Format options. I used this technique to create paint splotches in the colours I needed for my "couleurs" slide.
- When inserting audio clips, you need to make sure the file is .mp3 or .wav. (I use Voice Memo on my phone, import the files to iTunes and convert to .mp3.) An alternative that I hear people have been using is the Online Voice Recorder, where it allows you download an .mp3 copy of your recording. Create a folder in Drive and adjust the share settings (I have mine set to "anyone with the link can view") and plop your audio files in there. Any files uploaded into that folder will automatically be given the same share settings. Then you can go to Insert - Audio and select the file from your Drive.
- To select objects that you want to link to other sites or to other slides within the presentation, such as the activity numbers on the first slide, hover your mouse over the object's border until the arrow pointer turns into a four-point arrow. Then click on the chainlink icon that pops up in the menu bar and add your hyperlink.
- To have an object linked to an audio file, you would have to insert the audio file first. Then click on the audio icon and click on "Replace image" in the menu bar above, and select the image you would like to use.
Click here to view the interactive slide deck.
To make a copy of the interactive French activities I created for my grade 2 class, click on the screenshot below.

Here is a list of the exit tickets/mini quizzes I made using Google Forms:
- Week 1: Les contraires
- Week 2: Vocabulaire (Où est mon chien?)
- Week 3: Les couleurs
- Week 4: Les nombres 1 à 20
- Week 5: La famille
Feel free to use what you like and, as always, drop me a comment below if you have any questions or suggestions.
- Thursday, May 07, 2020
- 7 Comments


